

Linked List: Explained in 4 minutes

Linked List is one of the most fundamental data structures in computer science and a must-know topic for coding interviews.

Unlike arrays, linked lists don’t require you to predefine a size.
They allocate memory dynamically as elements are added. And because each element points to the next, you can insert or remove nodes without shifting anything.
In this article, I’ll break down:
What a linked list is and how it works
Different types of linked lists
Most common linked list operations and their time complexities
and the most common interview patterns built around linked lists
I also made a 4 minutes video on Linked List. Check it out for more in-depth and visual explanation.
Subscribe for more such videos!
1. What is a Linked List?
A linked list is a linear data structure made up of nodes.
Each node contains two parts:
A value: the actual data you want to store
and a pointer or reference to the next node in the sequence
The last node points to null, indicating the end of list.
Unlike arrays, where all elements are stored together in a single, continuous block of memory, the nodes in a linked list can be scattered across memory.
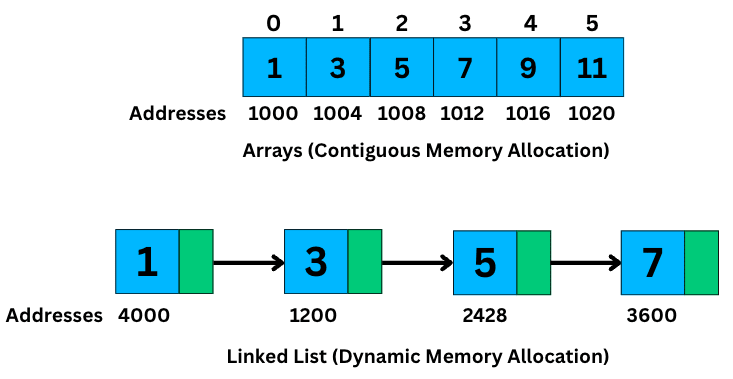
What keeps them connected are those pointers linking one node to the next.
This structure makes linked lists highly flexible. You can grow or shrink them dynamically, and insertions or deletions don’t require shifting large chunks of memory like arrays do.
But this flexibility comes with a trade-off.
Since the elements aren’t stored together, you can’t jump directly to a specific item like you can with arrays.
Instead, to access the 5th or 10th element, you may have to traverse the list from the beginning, one node at a time, which takes linear time.
2. Types of Linked Lists
Depending on how the nodes are connected, we can categorize them into three common types:
1. Singly Linked List
In a singly linked list, each node contains a value and a pointer to the next node and that’s it.
class ListNode {
    int val;
    ListNode next;

    ListNode(int val) {
        this.val = val;
        this.next = null;
    }
}
You can only move in one direction, from the head toward the tail.
It’s simple to implement and memory-efficient.
But there’s a downside: if you need to go backwards, there’s no easy way. You’d have to start from the head and traverse again until you reach the previous node.
Singly linked lists are great for problems where you only need forward traversal.
2. Doubly Linked List
A doubly linked list takes things one step further.
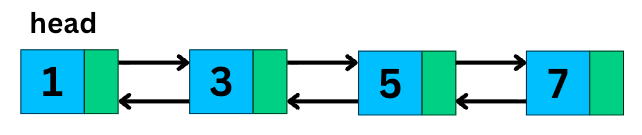
Each node has two pointers:
One pointing to the next node
One pointing to the previous node
class DoublyListNode {
    int val;
    DoublyListNode next;
    DoublyListNode prev;

    DoublyListNode(int val) {
        this.val = val;
        this.next = null;
        this.prev = null;
    }
}
This means you can move forward and backward, which makes certain operations much more efficient.
But the trade-off is that it uses extra memory to store the additional pointer and it introduces a bit more complexity in updating links during insertions or deletions.
Doubly linked lists are widely used in real-world systems like: LRU caches, text editors for undo/redo functionality, and browser history navigation.
3. Circular Linked List
A circular linked list is a variation where the last node points back to the first node, instead of null.
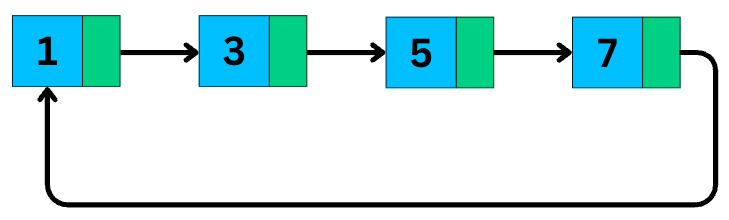
This forms a loop. You can start at any node and keep going until you’re back where you started.
class CircularListNode {
    int val;
    CircularListNode next;

    CircularListNode(int val) {
        this.val = val;
        this.next = this; // initially points to itself
    }
}
It’s great for problems where you need cyclical behavior like round-robin scheduling, or multiplayer games where turns cycle through players.
3. Operations on Linked Lists
Now that we know what linked lists are and the different types, let’s go over the most common operations you’ll perform on them.
1. Traversal
Traversal means moving through the list, visiting each node one by one. You start at the head and move one node at a time.
void traverse(Node head) {
    Node current = head;

    while (current != null) {
        System.out.print(current.value + “ -> “);
        current = current.next;
    }

    System.out.println(”null”);
}
This operation takes O(n) time because, in the worst case, you might visit every node.
2. Search
If you want to find whether a value exists in a linked list, you must:
Start at the head
Check each node one by one until you find the value or reach the end
boolean search(int target) {
    Node current = head;

    while (current != null) {
        if (current.value == target) {
            return true;
        }
        current = current.next;
    }

    return false;
}
Since this is a linear search, it takes O(n) time in the worst case.
3. Insertion
Linked lists really shine when it comes to insertion because you don’t have to shift elements like you would in an array.
There are different cases depending on where you are inserting a node:
Insert at the Beginning
This is the fastest case.
All you need to do is:
Create a new node
Point its
nextto the current headUpdate the head to the new node
void insertAtHead(int value) {
    Node newNode = new Node(value);
    newNode.next = head;
    head = newNode;
}
It takes constant time since no traversal is needed.
Insert at the End
To insert at the end, you have to:
Start at the head
Traverse the list until you reach the last node
Update the last node’s
nextto the new node
void insertAtEnd(int value) {
    Node newNode = new Node(value);

    // If list is empty, new node becomes head
    if (head == null) {
        head = newNode;
        return;
    }

    // Otherwise, go to the last node
    Node current = head;
    while (current.next != null) {
        current = current.next;
    }

    current.next = newNode;
}
If you maintain a tail pointer, you can insert in constant time O(1). Otherwise, you’ll need to traverse the entire list to find the last node, which takes O(n) time.
Insert at a Given Position
To insert at a specific position (say after the 5th node), you must:
Traverse to that position
Adjust the pointers to insert the new node
void insertAtPosition(int value, int position) {
    if (position == 0) {
        insertAtHead(value);
        return;
    }

    Node current = head;
    // move to node at position-1
    for (int i = 0; i < position - 1 && current != null; i++) {
        current = current.next;
    }

    Node newNode = new Node(value);
    newNode.next = current.next;
    current.next = newNode;
}
Again, this requires O(n) time in the worst case.
4. Deletion
Like insertion, deletion can also vary based on position.
Delete from the Beginning
This is fast. Just move the head pointer to the next node:
void deleteHead() {
    if (head == null) {
        return; // nothing to delete
    }
    head = head.next;
}
This is constant time since no traversal is needed.
Delete from the End or Middle
To delete the last node or a node in the middle:
You have to find the previous node
Update its
nextpointer to skip the node you want to delete
void deleteAtPosition(int position) {
    if (position == 0) {
        deleteHead();
        return;
    }

    Node current = head;
    // move to node at position-1
    for (int i = 0; i < position - 1 && current != null; i++) {
        current = current.next;
    }

    // skip the node at `position`
    current.next = current.next.next;
}
Since there’s no backward pointer in a singly linked list, this means traversing from the head, which takes O(n) time.
4. Common Interview Patterns
1. Fast and Slow Pointers
It is also known as Floyd’s Tortoise and Hare algorithm.
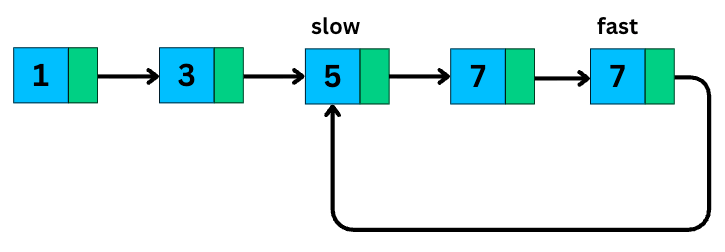
You use two pointers:
The slow pointer moves one step at a time.
The fast pointer moves two steps at a time.
This simple trick allows you to solve problems like:
Cycle detection: if there’s a loop, the fast and slow pointers will eventually meet.
and Finding the middle of a linked list
2. Linked List In-Place Reversal
This is a must-know technique in interviews. The challenge is to reverse the direction of pointers so the last node becomes the new head.
We can do it in-place by maintaining three pointers at previous, current and next node.
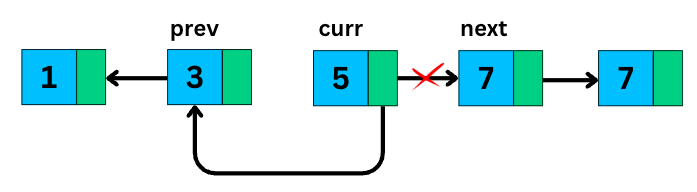
void reverse() {
    Node prev = null;
    Node curr = head;

    while (curr != null) {
        Node nextNode = curr.next; // store next
        curr.next = prev;          // reverse pointer
        prev = curr;               // move prev forward
        curr = nextNode;           // move curr forward
    }

    head = prev; // new head after full reversal
}
And then walking through the list and flipping the pointers one by one.
3. Dummy Node
Another common trick is using dummy nodes. This one’s a clean code technique that makes your implementation simpler and less error-prone.

A dummy node is just a placeholder node that you insert before the real head of the list.
It eliminates messy special cases like:
“What if we delete the head?”
“What if insertion happens at the very beginning?”
“Do we need separate logic when head changes?”
Node deleteAll(Node head, int target) {
    // 1. Create a dummy node before the real head
    Node dummy = new Node(0);   // value doesn’t matter
    dummy.next = head;

    // 2. Use current pointer starting from dummy
    Node current = dummy;

    while (current.next != null) {
        if (current.next.value == target) {
            // Skip the node with target value
            current.next = current.next.next;
        } else {
            // Move forward only if we didn’t delete
            current = current.next;
        }
    }

    // 3. New head might have changed
    return dummy.next;
}
With a dummy node, you treat the head like any other node so your logic stays uniform and your code gets much cleaner.
Thank you for reading!
If you found it valuable, hit a like ❤️ and consider subscribing for more such content.
If you have any questions or suggestions, leave a comment.
P.S. If you’re enjoying this newsletter and want to get even more value, consider becoming a paid subscriber.
As a paid subscriber, you’ll unlock all premium articles and gain full access to all premium courses on algomaster.io.

There are group discounts, gift options, and referral bonuses available.
Checkout my Youtube channel for more in-depth content.
Follow me on LinkedIn, X and Medium to stay updated.
Checkout my GitHub repositories for free interview preparation resources.
I hope you have a lovely day!
See you soon,
Ashish
Love this!