

20 Git Commands EVERY Developer Should Know

If you want to become a great developer, you need to master Git.
But, Git can feel confusing and overwhelming. With so many commands and options, it’s hard to know which ones actually matter.
In this article, I’ll walk you through the Top 20 Git Commands every developer should know.
These are the exact commands I’ve used again and again over the past 11 years as a programmer and they cover almost 99% of real-world Git use cases.
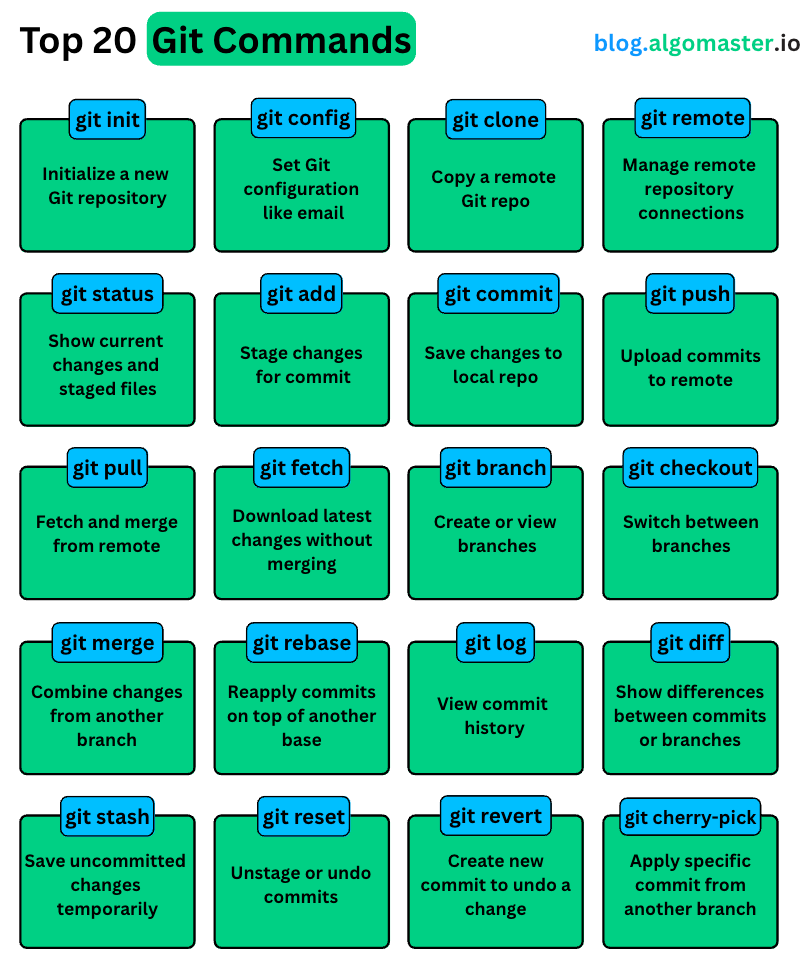
If you get comfortable with just these, you will be able to handle almost anything git related while working on projects.
Lets get started.
1. git init
Let’s start at the very beginning.
git initThis command turns a regular folder into a Git repository.
Behind the scenes, it creates a hidden .git folder.
This folder holds everything Git needs—your commit history, branches, logs, and all the metadata that powers version control.
You’ll typically use git init when starting a brand-new project from scratch.
Once you run git init, Git starts watching your files for changes.
From here on, you can commit changes, create branches, roll back mistakes, and more.
But before you start making commits, there’s one important thing you need to do: tell Git who you are.
That’s where git config comes in.
2. git config
This command lets you set your name and email so Git can tag each of your commits with your identity.
Here’s how to set it up:
git config --global user.name "Your Name"
git config --global user.email "you@example.com"
The --global flag means this configuration applies to all your Git projects.
But if you want to set a different name or email just for one project, you can run the same command without the --global flag, inside that project’s folder.
This step might seem small, but it’s actually very important, especially when you’re working in a team.
Git uses this information to track who made what change.
Now let’s say you’re not starting a new project locally. But, joining an existing one hosted on a remote repository, like Github.
3. git clone
In that case, you use the git clone command followed by the repository’s URL:
git clone <https://github.com/user/project.git>This command does two things:
It downloads the entire project, including all files, folders, branches, and commit history—so you get a complete local copy.
It sets up a connection to the remote repository, so you can easily push your changes or pull updates from others.
Once cloned, you’re ready to start working on the project locally.
Now let’s imagine a different scenario: your local Git repository isn’t connected to any remote.
In that case, Git has no idea where to push your changes.
That’s where the git remote command comes in.
4. git remote
Using git remote, you can add, view, or remove remote connections. Remote repository can be hosted anywhere like GitHub, GitLab, Bitbucket, or even your own server.
To check if your project already has any remotes configured, run:
git remote -vThis will list all the remote URLs your project can push to or pull from.
Example Output:
origin  https://github.com/algomaster-io/git-tutorial.git (fetch)
origin  https://github.com/algomaster-io/git-tutorial.git (push)
If you need to add a new remote, use:
git remote add origin <https://github.com/user/project.git>Here, origin is just an alias for your remote. It’s not special, but it’s a common convention for the primary remote.
Once you’ve added a remote, Git knows where to send your code when you push it.
Alright, now that we’ve covered how to set up Git locally and connect it to a remote repository, let’s move on to how you actually start working with your code and tracking changes.
5. git status
If there’s one Git command you’ll find yourself using constantly, it’s this one:
git statusThink of it as your project’s dashboard—a quick snapshot of everything happening in your working directory.
Whenever you’re unsure about what’s changed, what’s staged, or what’s untracked, git status gives you the full picture.
Sample Output:

It shows you:
Which files have changed and are staged for commit
Which files have changed but are not staged
Which files are untracked
Before committing anything, it’s a good habit to run git status.
It helps you decide what to stage, what to skip, and what needs attention.
Once you’ve reviewed the changes, your next step is usually to stage the right files using git add.
6. git add
When you run git add, you’re telling Git to include this in the next snapshot.
Just editing a file isn’t enough. Git doesn’t track your changes automatically.
Until you run git add, those changes are invisible to Git when it comes time to commit.
You can stage a specific file by running git add filename:
git add filenameOr, if you want to stage everything that’s changed in the current directory, run:
git add .git add is like packing your code changes into a box and getting them ready for delivery.
Once your changes are staged, it's time to lock them in with a commit with git commit command.
7. git commit
Think of git commit as hitting “Save” in the world of version control.
It takes a snapshot of your codebase at that point in time along with a message describing what changed and why.
You just run:
git commit -m "Add login feature"That message isn’t just a label, it’s a log of what you did.
Later, when you’re looking through your project’s history (or fixing bugs), clear commit messages will save you and your teammates a lot of time.
If you’re working on files that Git already knows about (i.e., they’ve been committed before), you can skip the git add step using:
git commit -a -m "Update login error handling"The -a flag tells Git to automatically stage all modified tracked files before committing.
But note—this only works for files Git is already tracking.
If you’ve created a new file or only want to include specific files in the commit, you still need to run git add first.
Sometimes, you commit too early or want to change the commit message.
In that case, you can use:
git commit --amendThis lets you either edit the commit message or include additional changes (as long as they’ve been staged with git add).
git add and git commit are local operations. Your changes are saved on your machine only. No one else can see them yet.
8. git push
To share your commits with others, you use:
git pushThe git push command sends your commits from your local repository to a remote one, like GitHub or GitLab.
It’s how you sync your changes with the central project.
Here’s a basic example:
git push origin mainThis command pushes your changes to the main branch of your remote repository. Now anyone else working on the project can see your updates.
Quick note: In most real-world projects, you don’t push directly to the main branch. Instead, you push to a separate feature branch, and then create a pull request or code review before merging into main.
Sometimes, when you're working on a project with others, someone else may have already pushed their changes before you.
That’s why, before you push your work, it’s a good idea to pull the latest changes so your local copy is up to date and you don’t accidentally overwrite someone else’s work.
To do that, we use git pull command.
9. git pull
This command does two things in one step:
It fetches the most recent commits from the remote repository.
Then, it merges those commits into your current local branch.
You can also specify the branch that you want to pull from. It will merge them into whatever branch you’re currently on.
git pull origin mainBut what if you don’t want to merge anything just yet?
Maybe you just want to see what’s changed on the remote without affecting your local work.
That’s what git fetch is for.
10. git fetch
git fetch originThis command contacts the remote and downloads all the latest changes—new commits, branches, etc.—but it doesn’t touch your working directory.
Your current branch remains exactly the same.
If you're on the main branch and want to see what new commits are on the remote origin/main, run:
git log HEAD..origin/mainThis shows the commits that exist on the remote but not on your local branch.
Sample Output:

git fetch gives you full control—you fetch first, review, and only merge when you're ready.
Speaking of branches—let’s look at how to create and work with them next.
11. git branch
When you’re working on a new feature or fixing a bug, it’s best to keep that work separate from the main codebase.
That’s where branches come in.
To create a new branch we simply run:
git branch new-featureThis creates a branch called new-feature , giving you a safe space where you can make changes without affecting the main branch.
Once you're done, you can merge your changes back into the main branch or open a pull request for review.
To see a list of all your local branches, just run:
git branchSample Output:
  dev
* main
  feature/login
  hotfix/navbar-bug
The branch you’re currently on will be marked with an asterisk (*).
But if you have multiple branches…How do you switch between them?
That’s where git checkout command comes in.
12. git checkout
git checkout new-featureThis switches your working directory to the new-feature branch. It’s like opening up a different version of your project focused on a specific task.
If you want to create a new branch and switch to it in one step, you can use:
git checkout -b new-featureBut git checkout isn’t just for switching branches. It’s a versatile command you can use in other ways too:
Explore a past commit by checking out its hash:
git checkout 4f27a6e
Switch back to your previous branch:
git checkout -
Discard changes and restore a file to its last committed state:
git checkout -- style.css
Checkout a specific file from another branch:
git checkout feature-branch src/app.js
Because git checkout tries to do a lot of different things, Git later introduced a cleaner alternative:
git switchThis command focuses purely on switching branches.
Once you’re done working on a branch and want to bring your changes back into the main project, you use: git merge.
13. git merge
git merge combines the changes from one branch into another.
Here’s an example:
git merge new-featureThis tells Git to take the changes from the new-feature branch and combine them into the branch you are currently on.
If the changes don’t overlap, Git will merge everything automatically.
But if both branches have modified the same parts of a file, Git won’t know which version to keep.
That’s called a merge conflict, and Git will pause and ask you to manually resolve it.
Sample Merge Conflict Output:

Git marks the conflicting files. If you open one (e.g., src/App.js), you’ll see conflict markers like this:
<<<<<<< HEAD
console.log("Welcome to the main branch");
=======
console.log("Login feature initialized");
>>>>>>> feature/login
You now have to manually resolve the conflict, remove the conflict markers, and keep the correct code.
After resolving:
git add src/App.js src/components/Header.js
git commit
This final commit will complete the merge.
Now, while merging is a safe and common way to combine changes, it has a small drawback—it can clutter your commit history.
You may end up with lots of merge commits, especially if you’re merging frequently.
14. git rebase
If you like keeping your commit history neat and linear, git rebase is the command for you.
Unlike git merge, which combines branches and often creates an extra merge commit, git rebase replays your commits on top of another branch as if you wrote them after the latest changes.
* 3f9e1b2 Add login form validation
* 1a2d3f4 Create login page UI
* a12cd3e Update homepage banner
* 91b2ea3 Initial commit
This makes your commit history look like a straight line instead of a mess of merges.
Let’s say you’re working on a feature branch, and main has moved forward.
You can update your feature branch with the latest changes from main using:
git rebase mainThis takes all the commits from your current branch and places them on top of the latest commit on main, one by one.
This results into a cleaner, more linear project history that’s easier to read and reason about.
Note: Remember to not rebase branches that others are working on. Because rebase rewrites commit history, it can create confusion or conflicts for your teammates.
When used properly, git rebase is a powerful way to keep your project history clean, clear, and easy to follow.
15. git log
Once you’ve made a few commits, you’ll probably want to look back and see what changed, when, and by whom.
That’s where git log comes in.
git logThis command gives you a detailed history of commits showing commit hashes, author names, dates, and commit messages.
Sample Output:
commit 3f9e1b2a8c5b7894dc8d39f12c4f271c51a2f0e4
Author: Jane Doe <jane@example.com>
Date:   Mon May 13 10:45:12 2024 +0530

    Add login form validation

commit 1a2d3f4e6b0c34b18ff9d1b8e20d4b6129a15a78
Author: Jane Doe <jane@example.com>
Date:   Sun May 12 17:08:45 2024 +0530

    Create login page UI

commit a12cd3e6aa719c3b32c29fd2f1123d2b31434cc9
Author: John Smith <john@example.com>
Date:   Sat May 11 14:30:59 2024 +0530

    Update homepage banner
If you want a more compact view, try:
git log --onelineSample Output:
3f9e1b2 Add login form validation
1a2d3f4 Create login page UI
a12cd3e Update homepage banner
This shows the commit timeline in one-line-per-commit format.
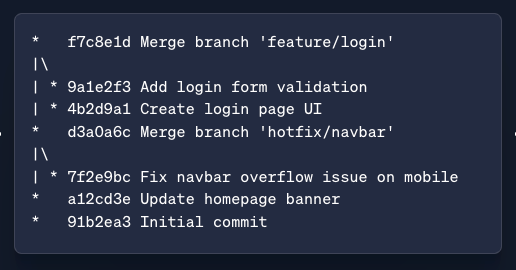
If you want to visualize branches and merges, you can run:
git log --graphSample Output:
* commit a1b2c3d (HEAD -> main, origin/main)
| Author: Jane Doe <jane@example.com>
| Date:   Tue May 13 10:23:45 2025 -0700
|
|     Fix pagination bug
|
* commit b2c3d4e
| Author: John Smith <john@example.com>
|
|     Add dark mode toggle
|
*   commit c3d4e5f
|\  Merge: d4e5f6g e5f6g7h
| | Author: Jane Doe <jane@example.com>
| |
| |     Merge feature/api-v2 into main
| |
| * commit d4e5f6g (feature/api-v2)
| |
| |     Complete API v2
|/
* commit f6g7h8i
|
|     Update docs
This adds a branching diagram next to your commits, making it easier to see how your project evolved over time.
git log is super useful when you’re tracking down bugs , or just reviewing your work.
And speaking of reviewing—before you commit, it’s always smart to check what’s changed since your last commit.
That’s where git diff command comes in.
16. git diff
git diff gives you a line-by-line comparison between your working directory and the last commit.
git diffSample Output:
diff --git a/src/App.js b/src/App.js
index 3a5b2c1..7d8e9f2 100644
--- a/src/App.js
+++ b/src/App.js
@@ -12,7 +12,10 @@ function App() {
   return (
     <div className="App">
-      <h1>Welcome to My App</h1>
+      <h1>Welcome to My Awesome App</h1>
+      <p>Start by logging in to continue.</p>
     </div>
   );
 }
It highlights what’s been added, removed, or modified so you know exactly what you’re about to commit.
You can also use git diff to compare changes between branches or specific commits:
git diff branch1..branch2This shows what’s different between two branches—great for code reviews or deciding whether a branch is ready to merge.
17. git stash
Sometimes you’re in the middle of working on something and suddenly, you need to switch branches or handle a different task.
But your changes aren’t ready to commit yet.
You can use git stash command to temporarily save all your changes both staged and unstaged.
git stashIt’s like putting your work in a drawer so you can come back to it later.
When you're ready to pick up where you left off, just run:
git stash applyThis brings back your stashed changes while keeping the stash in case you need it again.
But, if you want to apply the stash and remove it at the same time, use:
git stash popNow, let’s say you've made a mistake and want to undo a commit or reset your branch.
That’s where git reset comes into play.
18. git reset
git reset is one of the most powerful commands for rolling back changes.
It moves the current branch’s HEAD pointer to a previous commit—essentially rewinding your project to an earlier state.
Depending on how much you want to undo, you can use git reset in three different ways:
Soft Reset
git reset --soft HEAD~1Moves the HEAD back by one commit, but keeps all your changes staged.
Use this when you want to adjust a previous commit or fix a message.
Mixed Reset
git reset HEAD~1Moves the HEAD back and unstages the changes, but keeps them in your working directory.
Perfect when you want to start over on staging but don’t want to lose your code.
Hard Reset
git reset --hard HEAD~1This one completely wipes out changes in both the staging area and working directory.
Use it with caution as it permanently deletes uncommitted work.
If you’ve already pushed a commit to a shared repository and need to undo something, git revert is your safer bet.
19. git revert
If you’ve already pushed a commit to a shared repository and need to undo something, git revert is the safer option.
Unlike git reset, which rewrites history, git revert preserves the history by creating a new commit that reverses the effects of a previous one.
Here’s how you use it:
git revert <commit-hash>This doesn’t delete the original commit—it simply adds a new one that undoes the changes from that specific commit.
What if you only want to copy a specific commit from one branch to another without merging everything?
That’s where git cherry-pick command comes in.
20. git cherry-pick
git cherry-pick <commit-hash>This command takes a single commit from another branch and applies it to your current branch, as if you made that change yourself.
It’s super useful when you need a bug fix or feature from another branch but don’t want to pull in everything.
Just be mindful that cherry-picking creates a new commit with the same changes but a different hash, so it’s not identical to the original.
Thank you for reading!
If you found it valuable, hit a like ❤️ and consider subscribing for more such content every week.
P.S. If you’re enjoying this newsletter and want to get even more value, consider becoming a paid subscriber.
As a paid subscriber, you'll unlock all premium articles and gain full access to all premium courses on algomaster.io.
There are group discounts, gift options, and referral bonuses available.
Checkout my Youtube channel for more in-depth content.
Follow me on LinkedIn and X to stay updated.
Checkout my GitHub repositories for free interview preparation resources.
I hope you have a lovely day!
See you soon,
Ashish
Learning git is a must if you're serious about software engineering.
Great article and list, Ashish!
Thanks Ashish for this article with compilation of all the important git commands. It comes in handy as a refresher.